Showing posts with label irish perennial crops. Show all posts

Wednesday, March 28, 2012

Mushroom Magic

Mushrooms are pretty essential in a lot of cooking, great with steak or stir fries, the simple mushroom omelet or a creamy pasta sauce are some of the quickest, tastiest meals one can do.
There are so many varieties now it can be a little confusing.
If you are into types other than white button there can also be the question of availability.
Mushrooms can be grown throughout the year – under cover as I do or in a cellar, cupboard, garage etc.

In the autumn/winter mushrooms can even be grown in a greenhouse, as they don't need to have light excluded.


Mushroom seed, or spawn, is fairly easy to source on ebay, particularly the more exotic types.
I picked up a pack of dry spawn for simple white button mushrooms from Dangan nursery centre in Galway.
The type is Agaricus, produced by Suttons and retails at €6.80

Finishing mushrooms can vary, i.e. some require daylight to finish off or get colour but getting any variety of them started is exactly the same across the board.

What you need to think about first is a cellulose rich substrata - or for people like me wood or wood product mixed in with manure to create a subsoil.
I used well rotted farmyard manure, then lots of wood bark and wood bits from under the log pile and straw from last years oats that had been left on top of the asparagus and strawberry plants over winter.
But any woody - papery type substance will do, shredded waste, paper toilet rolls, old books or telephone directories, old cotton clothes, hardwood sawdust or woodchips - whatever else you can think of.

Sweepings from under firewood storage gave me a good supply of materiel. A little gypsum is also good.

Mushroom yield will be highest with a carefully selected mushroom compost made from straw, horse manure. Some people have even been successful growing mushrooms on sawdust and waste paper. Mushrooms can even be grown on the compost heap, although results will be variable. A mixture of horse or poultry manure and straw is preferred by mushroom growers, although most types of manure are suitable.

Anyway, I used some fish boxes to mark out the area I plan to turn into a mushroom patch. It is under an old hedge in some shade so a lot of old woody bits slowly breaking down there already.

Once the area had been marked out for each area I dug in straw, as much wood bark and bits as I could and half a wheelbarrow of well rotted farmyard manure to a depth of about 10"/25cm.

I dug in about half the spawn from a single envelope, my hope is this will give a different cropping time as mushrooms come in flushes.

I compacted the manure as best I could just whacking it down with the back of a spade.

The rest of mushroom spawn was sprinkled over the developed area and pressed in with a rake to a depth of about 3"/5cm.

Then a few sheets of news paper are laid over the area and damped down.
A fishbox is then put over the top to exclude light. These will be painted black to improve light exclusion and increase heat absorption.
A few days after spawning thin white threads - Mycelia - will appear.
After 10-14 days remove the newspaper and put in a 'casing' layer.

That is simply about 3cm or 1.5" of clean moist garden soil or bagged compost over the top.
This is called the casing layer

When the casing layer is established keep it moist but not overly wet.
Mushrooms grow in flushes. To pick gently twist the cap and pull away from the bed gently to avoid damage to developing mushrooms.

Pick regularly, removing old or diseased mushrooms immediately.
Mushrooms can keep producing 3-6 months after spawning.

Ideal temperature is about 15 degrees C, avoid temps if possible below 10 or above 20


Free Stats Hit Counter Web 
Analytics

Saturday, October 15, 2011

Winter Plantings

Really the last chance of the year to get winter greens and over winter plants in the ground.

This is the time to plant rhubarb plants, or split up old crowns.
This is also the best time to plant apple and other fruit trees

FRUITS
This year I am very impressed by the Johnstown range, for veg sets and in terms of delivery etc. find them far better than Mr Middletons.

This is the time to plant rhubarb plants, or split up old crowns.

This is also the best time to plant apple and other fruit trees. This is new to me, and Connemara is a challenging environment.
But after research, the best range seems to be English's Fruit Nurseries' here in Ireland.

WINTER VEG
Garlic
Buy garlic for planting in October or early November.
I often get asked how many one should plant, I figure, average house one bulb per week so say 50 cloves.

Onions and Leeks - Autumn onion sets can be planted now for fully ripe onions in June, Radar are particularly good.
Now is also a good time to grow leeks - plant well apart so you can intercrop with faster growing winter greens Tatsoi/Pakchoi now.

Brassica's - Greens like Pakchoi and Tatsoi can be planted to give fresh greens to winter stir fries, great with loads of chilli, garlic and ginger - nice fresh flavours in winter without the food miles.

Certain turnips, swedes and radish will also grow slow and be ready early spring.

Legumes For crop rotation some legumes are also good. I like to buy from seedaholics but there are other fine seed houses in Ireland.
Broad beans like Aquadulce, Aquadulce Claudia and Imperial Green Longpod towards the end of the month.
Peas Round seeded peas can be grown from October/November sowings. An organic variety is the Douce Provence. Other varieties include Feltham First, Meteor or Pilot (probably the hardiest of all varieties).


Free Stats Hit Counter Web 
Analytics

Tuesday, May 3, 2011

Permacrop 3 - the Sea Captains box

Well today was a bit of work in planning more than anything else. Rather than shore foraging, it is easier to grow and have coastal edible veg close at hand. For that reason I decided to develop a salty box in the perennial bed.
Drainage foundation, free from the garden
I also see, watching programs like masterchief and in top restaurants like NOMA a trend to these delicious but forgotten culinary gems. I guess because they have a short shelf life, supermarkets don't like them, so they have gone out of fashion. They are now presented as exotic, but were once common from fishmongers, packed in casks of seawater for transportation.

There are three veg I want to grow in the box. They are all edible coastal plants, and are halophyte - that is they like, need and /or tolerate salt. In addition to that they all like sandy, well drained soil so that was the requirement.
Scurvygrass (Cochlearia officinalis) is a native Irish perennial and grows to about 20cm in height.
Kind of tastes like a cross between horseradish and cress. For use in salads or stir fries.
It is also of historical interest to me and that's mainly why I'm cultivating it.
In the old days, scurvy occurred on ships spending months at sea without fresh fruits or greens, leading to a deficiency of  vitamin C.
But if a captain stowed a supply of scurvy grass and other sources of vitamin C like lime juice or saurkraut / zuurkool (hence the nicknames limey and kraut) as the 18th-century English explorer Capt. James Cook did, the sailors were safe. He also collected another type in New Zealand called Nau which I hope to get someday.

If you like bacon, that juicy, salty, crispy texture and taste, you will love these next two.
Samphire (Cachrys maritima)  - perennial - grows to about 30cm-ish and can be found in Irish coastal regions, I've also had it in the southern Netherlands, very short shelf life so it's best to grow your own rather than face the expense of it because they have to rush it from the Zeeuws estuaries to the point of sale, but great as a garnish for oysters. 
Its succulent, crispy, salty. Great raw or snipped into salads or soups - almost like vegetable bacon.

Salsola (Salsola Soda) is native to the Med, it grows to about 70cm and is very popular in Italy. Barba Di Frate (or Friar's Beard) is what the Neapolitan's called it while I was there, again, collected fresh from salt marsh's. It is actually irrigated using sea water.
It was fantastic served with cavolo nero and pine nuts, but a word of warning, it is notoriously hard to germinate.
Seaweed, free fertilizer
All of these plants, as I said, live in a saline coastal environment. That means they like brackish water, something between the sea and fresh.
Sea water has a specific gravity of 1.025 - i.e. it contains 25 grams of salt per litre, fresh water has none.
For that reason, and erring on the side of caution I will irrigate twice a week and go with a specific gravity of 1.010 - and you don't need a hydrometer to work this out.
Simply add 10 grams of sea salt or kosher salt per litre. The reason for sea salt is it contains no iodine or anti caking agents. The average watering can holds about 8 litres - that's 80 grams of salt per can.

Obviously I don't want the salt leaching into other beds, so the bed had to be prepared differently to the normal set up, especially as I included it in the perennial bed.
This took a bit of thought as it had to be lined and drain in a way that would keep the salt away from other plants, and it had to be quite sandy.
Initial outline
I came up with this scheme, a plastic sleeve made up of old feed bags that would drain freely into the bedrock / glacial sand base that is in the garden and was a 2 ft transverse box in the perennial bed

The other consideration was orientation, this was done on the basis of height. The bed lies facing NE, so the transverse runs SE. Salsola grows to about 70cm, Salsify to 30cm and scurvygrass to 20cm max, so that settled the issue.

Apart from that its step by step.

1 ) Cut a transverse trench across the bed, getting down far enough that salty water wont affect other plants, beds or bed sections. By the time I was happy, I had gone down about 24 inches / 60cm below the base of the side retaining boards in the raised beds.
2 ) Put in and secure transverse retainer boards either side of the trench
3 ) Clear the trench to the drainage zone and put in rocks to improve water flow
4 ) Tack in the plastic sheeting (I used old feed bags) around the edge of the box, to separate the salt box from neighbouring sections. Turn the bottom of the sheets inward and line the rocks carefully to hold it down.
The trench width was 2 feet / 60 cm, the width of the drainage sink at the bottom was about 18 inches / 45cm.
5 ) Next step was a layer of sand roughly raked in to fill in between the rocks and provide a free draining base
6 ) After that, a layer of dried seaweed that I ran through the new garden shredder - made a nice tidy job of it.
7 ) Then the backfill of soil well mixed with beach sand, always aiming to have very well drained soil to replicate the littoral maritime environment. The side that the Salsola and Samphire were going into got a bit more earth as they are succulents and are more fond of water/mud than scurvygrass
8 ) After that it was planting the seeds, marking them up and giving a top dressing of seaweed for extra nutrients. I also started to put in a cap around the box to secure the plastic on tom and give a better look to the bed.
I hope, and think, the scheme will work - and it does fit in well with the overall bed.
I hope you enjoyed the post, and if you found it of help or have any comments please do take the time to leave a message here at the blog, I love the feedback


Free Stats Hit Counter Web 
Analytics

Thursday, April 14, 2011

Seakale, germination and care - as well as something a little historical

Grandad's 1941 Dept of Ag leaflet's - cost 2s 6d !
Solid advice to kitchen gardners, still valid and helping the family 70 years later.
Thats value.
Sea Kale is a perennial green, hardy and reliable once established, and that's the trick.
My initial batch had a very poor germination rate,this is because the seed is contained in a cork like husk that allows the plant to propagate with the tides in nature.

After some research I found that removing the outer seed casing help's and speed's up germination.
Put the seeds in a bowl of water for a few days,then using a very sharp knife, like a craft knife or scalpel, very carefully and gently take off the outer husk. It's a little like a tiny avocado
Seakale seed, de-husked and ready for pots
Apparently germination usually takes place in 3 to 5 weeks at 15°c but -as I found -can be slow and irregular.
I have already planted out 4, 3 failed but the fourth is doing well under a cloche for now.
As the plant is perennial, and lasts many years, the main aim I have in the first year is to establish at least four plants to make a start.
Paper pots ready to take seed
A new tool I got myself this year came in handy. From Seedaholic in Mayo I got a Nether Wallop paper potter.
Now, I have made my own in the past, but that was all flour glue and lacked uniformity.
The paper potter saves time and bother, recycles newspapers and gives good, uniform starter pots.
It's a very simple, clever and cute addiion to the seed box.

The pots will not disintegrate until planted, even if soaking because their walls are several layers thick so will only bio-degrade after they are put into the ground.
Using the system means there is no root disturbance or damage because the paper pot goes straight in the ground will rot down and the roots will grow through it.

It also looks and feels good and could not be simpler to use. It's a once off investment and well worth it.

As for the seakale, I really look forward to getting it established and growing well, with a bit of luck.

The Fresh, creamy-white stalks of sea kale are a seasonal delicacy at the deadest time of year.
They were harvested from sandy beaches in Victorian times when it was a popular vegetable.
Collectors covered the stalks with sand to keep out the light and develop a delicate flavour.
But over time, wild supplies became so over picked and endangered that it was made illegal to harvest from the beach.

Seakale can be forced like chicory or endive to maintain delicacy to a similar height to rhubarb.
Unlike rhubarb, the frill of leaves at the top can also be eaten.
It can be eaten raw or cooked with melted butter. The Victorians cooked it with a white sauce and served kind of like asparagus.  So here's hoping this batch will do better!
fly leaf advert from 1941 manual


Free Stats Hit Counter Web 
Analytics

Friday, January 14, 2011

The Perennial kitchen garden plot, permanent crop choices

Well, the more I learn about gardening and plants, the more ideas I get. For people with limited space, or with just a flower garden a few of these plants may be of interest.
They provide food, and also garden colour - so well worth a look.
I will update this posting with my own pictures etc. as and when I get them, the pics shown are generic from searches.
This year I transplanted my horseradish and put rhubarb crowns in their permanent positions. With some great advice from gardenplansireland.com  I decided to dedicate one bed to perennial crops.
It means I will need to create a new one for rotation, but I have the space.

From the Irish seedsavers association in Clare I got a few seeds, including Sea Kale and a Salsify.

The sea kale is called Lily White. It has distinctive grey/blue green fleshy leaves that give a display of pure white flowers in late spring. It is a protected plant now in many places.
As a food crop it is the early shoots (like asparagus) that are eaten raw or cooked.
They are best when blanched so put a thick layer of straw over them in autumn/winter.
Don’t start cropping until the second year.

Salsify is a root vegetable that goes back to the middle ages. I do know it is not the easiest veg to prep, I believe the Dutch call it screaming housemaid!! It is very old, having been mentioned by Plinny the Elder.
Pulled in winter it has long tapering roots with a distinct flavour – some say oyster-like
As with the sea kale the flower is also good for ornamental gardener’s as all summer long they bloom with large brilliant purple daisy-like flowers

I am delighted to say they also have, again, tipperary turnip in stock. This was a massive success in last years garden as it was very hardy, gave a high return and some great meals.

The other main source of perennial food crops has been seedaholic's in Mayo.

The perennials I ordered from them were mainly herbs, but I also got three perennial veg.

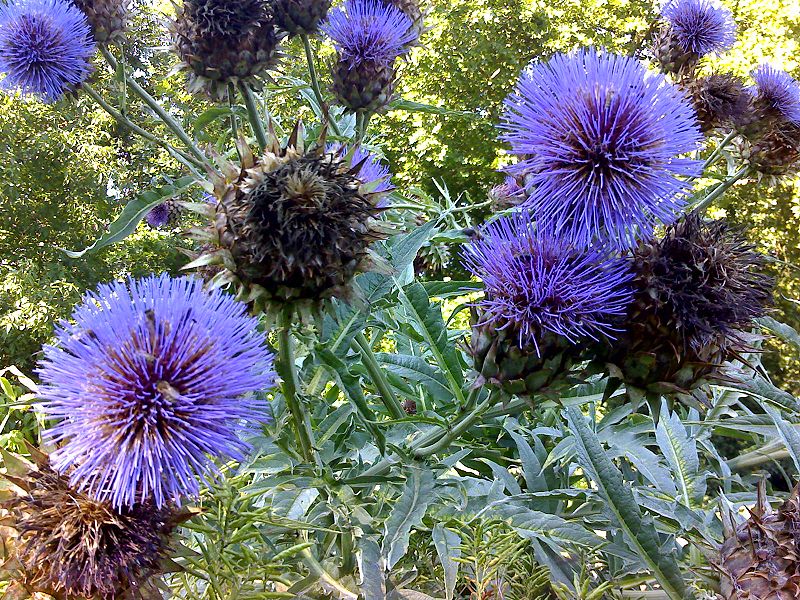
One close relative of the globe artichoke is Cardoon which is popular in France, Spain and Italy.

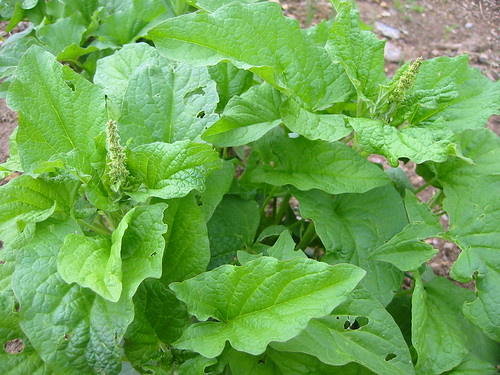
I got Good King Henry from them. Also known as Lincolnshire Spinach. It promises to be a very versitile plant.

The young leaves and flowering stems can be either eaten in salads or cooked like spinach.
The seed can be ground and mixed with flour then used in making bread.
Known as 'poor man's asparagus', the growing shoots can be tie together in bundles, cooked and eaten like asparagus. Young flower buds can be sautéed in butter

I also got a Sorrel from them - “De Belleville” French or Garden Sorrel
 Its meant to be very easy to grow, producing clumps of pale green leaves with a good lemon flavour.
I am told that once you've got a clump going it needs no attention other than when you want to eat it
Sorrel is a ‘herb-vegetable’ or ‘pot-herb’ as it can be cooked like a vegetable.
It can be harvested at baby leaf stage and is great in salads and sandwiches as it doesn't go limp but is most delicious when cooked

From Mr Middletons in Dublin I ordered two other perennials.

Jeruselem Artichoke tubers, they seem a lot less hassle than the globe version.
They also had Aparagus crowns in stock. I got Connovars Colossal as it had 6 crowns - easier to grow than from seed.
So, the plan is that this bed will be very low maintainence, and with any luck - permanently productive.


Free Stats Hit Counter Web 
Analytics